
I had been wanting to can some peaches this Summer. I love love love peaches! But it just didn't work out- I was neck deep in home decluttering and organizing ("Nesting" to the lay person =) at the time when they were cheapest. So I let that idea go. Then I heard that friends of ours had a pear tree that was open for the picking. I've never been a big pear fan, but I am a fan of free, and I know that both my kids loved pear puree as babies, so off I went.
Lesson no 1: Freebies can't be chooseies. These pears were pretty small and hard, and probably not the optimal fruit (the family that owned the tree didn't have much interest in them at all) but they were still pears!
Lesson no. 2: Picking pears isn't that difficult. It's actually kind of therapeutic. What needs to be remembered is that you have to peel all those pears you picked!
Lesson no. 3: When you bring an international friend along to pick thinking that they will enjoy it since they had fruit trees at home, also keep in mind that they are observing Ramadan and have been/will be fasting for 30 days. This means they will also take less pears home with them than expected. See lesson 2 for ramifications.

Lesson 4. Take breaks when peeling pears. Otherwise your hand will cramp like none other! But if you're in the zone, you might as well go for it...
Lesson 5. Save the peels! Apparently you can grind them up and use them in place of Zucchini in Zucchini bread. I have yet to make this bread, so I can't vouch for it yet, but I have two big bags of pear peel shavings awaiting me when I finally find the time. I'll keep you posted...
Lesson 6. Pear juice is good for detoxifying, dealing with constipation, and prostate health. I did not know any of this before. Still don't know it first hand, but it was something interesting I learned off the internet.

Lesson 7. While it would seem like a nice sharp pairing knife is the best choice, your finger tips and blood supply will thank you if you actually opt for a duller knife, much like the one pictured on the bottom.
* This is a painful lesson to learn.
*Also, all of that pear peeling will permanently stain a white knife handle.
Lesson 8. It will do the same thing to your fingertips.

* this picture was taken after washing my hands twice with soap.
Lesson 9. It's hard to take a focused picture of your own finger print.
Once the pears are peeled, there are all sorts of things to do with them!
Lesson 11. I am a huge fan of pear sauce. It is seriously the easiest, most versatile thing to make, and you can sweeten or season it any way you want or don't want! It was a great starting point and confidence booster to this novice.
Feeling good, I remembered how I started off this Spring making
Dandelion honey, so I thought it would be fun to end the Summer making Pear honey.
Lesson 12. The recipe didn't specify, but the pears should've been pureed down. It's not like pear sauce where you can puree it later.

Lesson 13. This is what happens to your immersion blender if you stick it in a pot of boiling honey because the pears didn't break down like you thought they would.
Lesson 14. Your blender will still work, but it probably get's teased at night when tucked away with all the other appliances.
Because it is a two+ hour process, I thought "hey, I'll just do this while I'm doing other things"
Lesson 15. Making honey is not something you should just do while you're doing other things.

Everything was going fine right up until the end when there was a medical emergency (not directly involving myself or pear related for once!) and my attention was diverted and the honey boiled for too long, turning into more of a candy texture.
Lesson 16. All those evenings of watching Chopped and Iron Chef do pay off! Frustrated at overcooking the honey, especially since it had deformed my blender, I was determined not to let it go to waste (those pears might be free but all that peeling wasn't easy!)
So I decided to experiment with ways to salvage it:
Dippi

ng plastic spoons in and getting them a good coat. These can be used later to sweeten a cup/pot of tea.
Dropp

ing spoonfulls onto tin foil and making little candy discs.
And towards the end, when it was getting cool enough to handle, rolling it into little balls. The pictures of these little lumpy brown balls don't look appetizing in the least, so I didn't post one, but plunk on in your pot of tea and it works beautifully!
Lesson 17. When working with hot honey, use tin foil. But once it cools, transfer it to wax paper.
*I have tried all ways of doing this- trust me, wax paper does not hold up to hot honey, and tin foil sticks to it later.
Lesson 18. Making honey and working with it is hot (on the bright side, the burns act to cauterize all those finger tip cuts from peeling!), time sensitive, messy work!
Lesson 19. Homemade jam recipes call for WAY too much sugar! You don't have to put all of that sugar in, just boil it a little longer and they will jell.
Lesson 20. Waste not, want not. I was able to put several small jars of my thick pear-supposed-to-be-honey-goo in a water bath and get them liquified enough again to use them in my jelly instead of sugar.
Lesson 21. You can make pear butter in your crock pot, but it takes FOREVER! And it will make a huge sticky splatter mess on your countertops.
Lesson 22. You can get away with not having some exact canning tools, like I just used my big stock pot, but you really should have the proper tongs or can-grabbers/basket to get them out of the water. This will save you a lot of steam burn, frustration, and fear of dropping and cracking a jar.
Lesson 23. It was a lot of work, and a lot of trying out new things (which can make me kinda tense). But in the end, I at least now have a novice's idea of how to make pear sauce, pear puree, plum-kissed-pear-jam (sweetened), plum-pear jam (unsweetened), pineapple-pear jam, pineapple pear syrup, pear-apple and pear-peach crisp, pear bread, and pear honey (in all of it's various forms) and the freezer is full of all of this peary goodness. Also, I've learned that I like pear sauce even more than I like applesauce. Warm with just a little bit of sweetness and spice, it is divine!
lesson 24: you may need a break from being in your kitchen after all of this (This has been a series of projects over the last two weeks for me- I only have one stock pot). Also, your husband may get tired of seeing pears everywhere and hearing your "ouch!es" from the peeling, heat, steam, splatter, etc...
Main lesson: it is still totally worth trying something new! And if the main ingredient is free, albeit not in perfect form (I think these pears were harder than most) then all the better because you stress out less about ruining it. Chances are ruination will happen, especially if this is a first go, but even then you can keep thinking of different ways to use things!

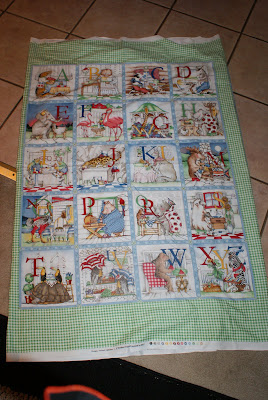 So, I am now planning to use it for 2-3 baby gifts! I have several friends at the gym that will be having babies within the next five months, and I thought this might a fun fabric to use for some of them (most of them are also being "surprised" by the sex of the baby, so I have to keep things gender neutral). My best idea, currently, is to use it for three blankets. Not cutting up the letters, just a straight up, rectangular blanket with this as the front, a soft flannel on the back. Some ribbons ties, etc. BUT, I wanted to throw this out there and see if any of the amazingly creative women who read this blog have any other ideas!


