Showing posts with label Sew It.. Show all posts

5/2/11

101 pillow ideas

Ok, so I don't have 101 ideas to share right now, but I'm hoping these ideas might inspire you, or get your creative pillow juices flowing, and from there we might get to 101!

Quilting
If you enjoy quilting but only have scraps left, a pillow can be a fun, colorful way to use them up. I think it would also be a great beginners sewing and quilting project; not quite as daunting as a whole quilt. Or, if you are making a quilt and have an odd square left, like I did while making my first baby quilt, a pillow is a sensible way to make good use of that material! I always make my pillows slipcovers, both for laundering purposes and my own inability to commit combined with my not wanting to waste perfectly good pillow stuffing.


this one makes me laugh to think that I use to have time to play around with a needle like that. I am in no way a great or even quilter or seamstress or needlepointdextress; I just enjoy creating! It's fun to come up with ideas and then to watch them materialize, isn't it? Well, at least when they materialize the way you envisioned them. But even when they don't, that's what makes it your creation!

idea: Last Summer I picked up a pretty little throw pillow that had a lovely embroidered handkerchief as the main block with several squares of material quilted around it. I think that might be a fun sewing project I'd like to share with my nieces or daughters!

Placemats

One of Jeni's cousins shared with her the idea of using placemats to create pillows. I was almost giddy when I heard of this idea! I LOVE table linens; they are my clearance downfall. So to have a new way to utilize them was/is so exciting!

To make them:
1) rip out one of the short side hems.
2) stuff with the desired amount of stuffing
3) stitch up the side again

voila! so easy! so pretty!

This is just one of those projects that can't go wrong, and can make such a difference in a room! I have two of these yellow placemat pillows on my guest bed in the nursery and they are the perfect touch to tie everything together! I couldn't have found better "real" pillows.


Table Runner Bolster Pillow:
Like I said, I have a weakness for linens, especially on clearance or garage sales. I was able to repurpose one of the brown table runners I'd purchased as a bolster pillow for our bed, since we love to read in bed. It was the perfect length to stretch pretty much from end to end of our king size. I purchased two body pillows for their stuffing, and that worked perfectly!


Bags
This one is another favorite! I found this great little bag at Goodwill one day and kept it for years trying to figure out ways to use it. Then a couple years ago when I was redoing my living room and looking for new, euroflare throw pillows, I realized it would work perfectly on my couch. Some stuffing and folding and top stitching, and suddenly I had a new favorite pillow. Now I always check garage sales, estate sales, antique shops and second hand stores for more bags or table linens printed with maps or designs that can come keep this one company =)


How about you? What's your favorite resource for making pillows?

4/2/11

Teaching/Learning

The theme for this month is going to be "Teaching/Learning". I wish I was able to say that I chose this topic because of my desire to share all the wonderful things God is teaching me or the lessons I am learning every day as I continue on this journey of motherhood. The reality is that I have a couple of projects I have been working on and I wanted to post the tutorials.  

(Here is a tip: I have a folder saved under my Favorites called "Craft Ideas". Every time I find a cute craft that I would like to try some day I save the link to this folder so that I can find it easily without having to spend a lot of time searching the internet for the tutorial.)

Project #1: A denim tic-tac-toe game

I found a tutorial here for a burlap tic-tac-toe game. I can't even remember how I stumbled upon this tutorial, but I'm thankful that I did. I decided to make this game for my niece's 2 yr birthday (I know, not really age appropriate, but I couldn't come up with anything else). I felt like the burlap was too rough, although very cute, so I chose to use denim. Unfortunately I did not think to take pictures while I was sewing this project, so you will only get to see what it looks like completed.


Items you need:
  • denim (30"x30")
  • ribbon (I bought two spools of ribbon, 9 ft each)
  • thread
  • felt


Step 1) Cut denim and ribbon and wash. Make sure you cut the perimeter ribbon an inch or so longer than what you need to make sure that you have enough.

Step 2) Pin and sew perimeter ribbon. I used a zig zag stitch on the top and the bottom of the ribbon.

Step 3) Pin and sew the ribbon that makes up the #.

Step 4) Cut letters out of the felt. I used Century Gothic font (size 400) and I traced the letters inverted on my felt so that there would be no pen marks on the front of the letter. I used "M" for Mom, "D" for Dad, "k" for Katie and "a" for Anna.


I apologize for this not being a very complete tutorial. Please let me know if you have any questions.

10/19/10

T-shirt Skirt Tutorial

I just finished my second t-shirt skirt and I am sad that it is now fall and I will have to wait until spring before I can wear it!! Here is a long thorough tutorial for this very EASY sewing project!

I started with a XXL men's t-shirt that I found for $1.50 at a local bargain store (Bargain Depot in Lawrence, KS...I love this place). You want to make sure that the t-shirt is plain with no logo/writing on either side.

1) Wash the t-shirt.

2) Turn the t-shirt inside out before you start cutting (this is a very important step).

3) Cut the t-shirt just below the neck opening.
4) Unfortunately, I do not have a template for cutting out the skirt. I cut my t-shirt to the following measurments: 24" long, 24" bottom hem and 20" top/waist. Note that you use the bottom hem of the t-shirt as the bottom of your skirt, so you only make 3 cuts (2 sides and the top).
5) Pin sides and sew a 3/8" (or 1/2") seam.
(If you slip the skirt on at this time it will most likely fit big, but you will be adding elastic to the waste and that will make it fit...I promise)

6) To sew the casing for the elastic waistband you will fold the top down 1" and pin. I used 3/8" elastic, so I wanted my casing to be 1/2". I sewed around the waist at 1/4" and 3/4". Make sure you leave about an inch open so you can insert the elastic. In my photos you will see a piece of black/white fabric...I used this as a "tag" so I know which is the back of the skirt.
7) Thread the elastic. I do this by hooking a safety pin to one side and feeding it through the casing.
8) Try the skirt on and pull the elastic through until it fits the way you want it to. Cut the elastic and sew the ends together with a zig zag stitch. Tuck the elastic back into the casing and sew the casing closed, being sure to backstitch and secure the casing.


This skirt took me about 1 1/2 hours to make (not including washing the t-shirt) but I was doing a lot of measuring, writing instructions and taking photos. This skirt is super comfy and very simple, but you could dress it up with some freezer paper stenciling, which I think I will do once I decide on a design.

9/22/10

I Need Your Ideas

As I am on a kick in terms of baby projects ...
I could use a little creative input!

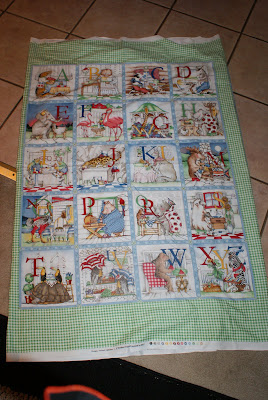
I have this fabulous piece of fabric that I bought quite a few years ago. It has the alphabet in blocks with animals and fun pictures. I bought it in a long enough length so that I have the alphabet three times over. Originally, I thought I might make Jonah some type of blanket/pillow that had his name on it. It's obvious that never materialized!

So, I am now planning to use it for 2-3 baby gifts! I have several friends at the gym that will be having babies within the next five months, and I thought this might a fun fabric to use for some of them (most of them are also being "surprised" by the sex of the baby, so I have to keep things gender neutral). My best idea, currently, is to use it for three blankets. Not cutting up the letters, just a straight up, rectangular blanket with this as the front, a soft flannel on the back. Some ribbons ties, etc. BUT, I wanted to throw this out there and see if any of the amazingly creative women who read this blog have any other ideas!

Care to share them with me?

9/15/10

Taggy (Taggie)

Per a request,
I am putting up the directions to create a Taggy!
As I have stated before,
it is such a fun, simple, and straightforward project!

Yesterday, I headed over to my in-laws for the morning.
My Mother-in-law had set it up for my teenage sister-in-law,
and three of her friends to each sew a Taggy.
They would get the benefit of somewhat a "sewing lesson",
time to hang out together,
and then they are donating their Taggies
to the local Pregnancy Care Center.
So, let's get started!

1) Start with two different fabrics. As I stated on a previous post, I like one side to have a little texture to it. You'll also want several different kinds of ribbon: different textures, widths, colors, patterns, etc. They don't have to match perfectly! The eccentricity of each Taggy with it's colors and ribbons is what make them fun and unique.

My two sides ...


2) Cut each fabric print into a square. The girls started with 12 inch by 12 inch squares. The past two that I have made were probably closer to 16 inch by 16 inch squares. Whatever size you chose. Then, I like to iron my edges under, to make the pinning process easier! Then, cut your ribbon into 4 inch lengths.
3) Lay your fabric squares HOW YOU WANT THEM TO LOOK. Inside sides turned inside. Turn all edges in and pin.

One Taggy getting prepped ...

4) Arrange your ribbons around the side and get the "look" you want. I had the girls do 5 ribbons on each side of their 12 x 12. For my larger one, I did 6 ribbons.

5) Fold ribbons lengths in half, slide edges in between the two fabrics, and pin the ribbons into place.

Ribbons getting pinned in place!

6) Sew all the way around the square - taking care to catch the ribbons!

All our Taggies ready to be sewn together!

That's it! Enjoy your Taggy and BE CREATIVE!

In a few weeks, we are having another "sewing lesson" and are going to be making some simple full size blankets for the Pregnancy Care Center! I'll post that as well!

8/31/10

Baby Time!

No, not baby time for me!
Thank goodness!
Errrr, I mean, just not yet.
When the right time comes ... I'll be excited -
But right now I'm enjoying all the other mommies having babies!
I'm rather obssessed with Taggies.
A dear friend from work (when I was working before Jonah was born)
made me a beautiful Taggy blanket for him.
They are so much cheaper to make than to buy.
Since then, I've worked on perfecting the look I like.

I recently made two Taggies with these fabrics
For friends with little girls on the way.
I have several other friends who are also expecting within 2-3 months.
So more will be following!
Such a simple project (which translates: Elisa can actually do it):
Two squares of cute fabric (I like one side to have texture)
with loops of ribbon sticking out all around the sides.
Use various colors, textures, widths, etc., of ribbon to make it fun.
Sadly, I forgot to take a pictures of the finished projects before I gave them away!
But, here are the colors I used in the past two,
And I can't wait to make some more in the next few weeks!

5/18/10

Table Runner

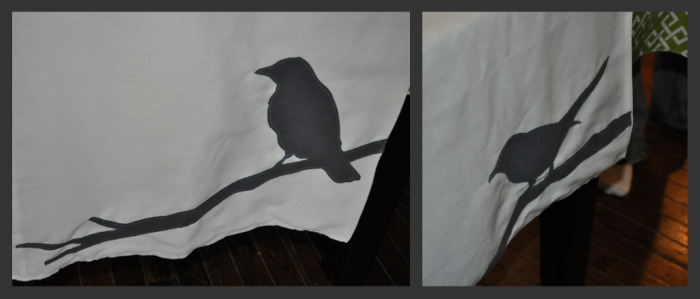
I've been sewing A LOT lately.  I think I like it because I don't have to think.  I just have to keep the sewing machine going in a straight line.  (hmmm...I wonder what that says about me...?)  This was one of my favorite projects from the past week.  I was scrambling to come up with some decorations for a Bridal Shower (shout out to Aimee and Matt - Holla!...okay I'm embarrassed) and decided to turn a couple of old sheets into table runner.  Two sheets + wonder under = very quick and easy table runner.   I LOVE wonder under! (sewing nerd alert!)

I now want to start ripping up more sheets and seeing what other things can be created.  I may post some of the other projects later.  I'm on a huge men's shirt reconstruction kick!  

2/13/10

Nursing Pads

After using disposable nursing pads for 4 months I decided to sew my own. Here are step by step instructions for this easy sewing project.

In order to make 4 pairs of nursing pads you will need 1/4 yard of flannel and 1/8 yard of fleece (don't forget to wash your fabric before you cut the fabric). Begin by tracing circles onto the fabric and cutting them out. You will need 4 flannel circles and 2 fleece circles for each pair. The circles should be between 3 1/2" and 4" in diameter (I traced around the top of a drinking glass).


After cutting out the circles, sandwich the fleece circle between 2 flannel circles and pin the fabric. You will want to sew the fabric together so that the fleece does not move around. I sewed two lines across the circle to accomplish this.


The final step is to sew around the circle using a lockstitch (that is just a straight stitch) and then sew around the circle again using the zigzag stitch.


Now you have a pair of nursing pads!!