As many of you have noticed. A Bird in the Hand has been slowly grinding to a halt. It's not that we haven't had anything to say, but that we are so busy living our lives that we had not been posting as much. Collectively it is time for us to take a break from regular posting.
Originally we started this blog to encourage one other and we will still do that when we have the time. Thank you so much to those who have checked in here regularly and added your thoughts to the blog. We may be back some day in a different season of our lives. We aren't shutting down completely, but posts will be much fewer and farther between.
Sincerely Sarah, Sarah K., Elisa, and Jeni.

7/6/11
6/28/11
Swan Song
I was really tickled to read that the subject of "family" was chosen for this month. I had reached the conclusion last month that contributing to this blog was one of the things I needed to let go of. From this month's theme, to my placement happening to be last in the month's writing rotation, to the "my point exactly" fact of having had a least two other posts planned out in my head and no time to get them done, I feel that conclusion being clearly reaffirmed and my exit being made plain before me. I've enjoyed the fellowship and ideas shared here, thanks for sharing with me and letting me share with you! I'm going to leave with a poem I wrote recently that sums up some of my thoughts, fears, and reminders as a mother. Being mothers is such a blessing and a ministry. I love how the simplest things can be so meaningful and inspiring! It's hard work, but there is such joy and reward in it.
I look forward to still reading up on what you're all up to here!
Time, Like Bubbles
Pure delight on your sun-kissed face
Taking turns to blow and chase
Showers of bubbles cascade and rise
Catch them if you can!
Time, like bubbles, floats away, flies away.
My heart yearns to cry out, "please slow down; let's just stay!"
My arms yearn to reach out, hold you close, keep you near.
But I've got to let you go, watch you grow, release you, dear.
Pure delight on my son-kissed face
Soaking in each little sweet embrace
Showers of kisses blown my way
I catch them in my hand.
And time, like bubbles, floats away, flies away.
My heart yearns to cry out, "please slow down; let's just stay!"
My arms yearn to reach out, hold you close, keep you near.
But I've got to let you go, watch you grow, release you, dear.
Pure delight on your mom-kissed face
Maturity and adulthood will too soon replace
Showers of precious moment swirl around
Hold them while you can!
For time, like bubbles, floats away, flies away.
My heart yearns to cry out, "please slow down; Let's just stay!"
My arms yearn to reach out, hold you close, keep you near.
But I've got to let you go, watch you grow, release you, dear.
You have a skies limit to reach, an ocean of God's love to discover!
My job is to train and to teach, not to fret and to hover.
You are carried by His grace, purposed in His design.
Not isolated and adrift in the shifting winds of time.
Our faith is not frail and our hope is not hollow!
So I'll be thankful to hold you today and not fear for tomorrow.
Pure delight on my Son-kissed face
Resting in His faithfulness, peace, love, and grace
Showers of prayers and praise pour out and ascend
Lord, You are holding them in your hand!
Inspired by and dedicated to my bubbly little Loveskis, who are growing up way too fast and whom I'm always gonna wanna hold "just one more time!" - SMN, 2011
6/15/11
Homemade Bread
Growing up there was a time when my mom would make homemade bread. It seemed like an awful lot of work. She would get up early and knead the dough and punch it down and I don't know what else (I was in junior high and high school so I wasn't paying too much attention). I found out when I was older that she was making sourdough bread.
My mother-in-law also makes homemade bread. She has made it several different ways including using a bread machine and using a stand mixer. I loved her bread and it seemed so much easier to make than what my mom made. My husband's grandma passed her bread machine on to me and I got my mother-in-law's bread recipe, so I make homemade bread often.
Something I strive to do is to make a fresh loaf when we are having company for dinner. It is not always possible because of my work schedule, but I try because over the years I have gotten many comments about the goodness of homemade bread. Eating homemade bread is something that I now take for granted and I have forgotten what a blessing it can be to people who don't get to eat it but on rare occasions.
I am thankful for my bread machine and bread recipe and I look forward to blessing many people with homemade bread. For those of you who would like to try making homemade bread, here is my mother-in-law's recipe:
Oatmeal Bread (by Pam Kueffer)
12 oz. water
2 T. oil
1 c. oatmeal
3-1/3 c. flour
1/3 c. sugar
2 T. wheat gluten
1 tsp. salt
1 T. yeast
Works well in machine, or: Mix well, knead 3 minutes, mixer. Rise 1 hr., shape into two loaves, two 8x4 pans. Let rise until doubled. Bake in preheated oven, 350 degrees, 35 minutes.
Enjoy! My favorite is hot out of the oven with butter and homemade strawberry freezer jam!!
6/10/11
A Legacy
When sitting down to write about the topic of family. I found myself quite stumped. It's not because I don't have anyone to write about, but because I am so blessed with so many family member that mean so much to me. Even narrowing the topic to family AND homemaking didn't really help. I have two delightful grandmothers that are both excellent bakers and cooks, and a wonderful Mama that puts creative flair into everything that she whips up. Even the men in my life have secret recipes stashed up their sleeves.
In order to keep this blessing going my 3 oldest take turns being my Sous Chefs while I prepare dinner. It is always their favorite "chore", so much so they sometimes end up quarreling about whose turn it is. I always figured that my girls would enjoy cooking with me, and they do, but it's my oldest son that takes the most pleasure in it.


It made me realize what an amazing legacy I have received and will be able to pass on to my children. It has made me so excited to continue to cook both with, and for, my children. Though I don't have those secret recipes {yet}, I do have the time and ability to make sure my kids eat fresh, delicious {at least I think they are, the kids don't always agree} and nutritious homemade meals 3 times a day. {except when 'Papa' brings donuts, but who is going to complain about that?}

 |
{And what boy wouldn't when he gets to wear this amazing "Cape-ron" made by Aunt Sarah!} |
I think it gives him some special one on one time and allows him to show off all of his measuring, chopping and pouring skills.
 This has been so wonderful for me because in most of the other areas of his life he seems to thrive on making things...er...difficult for all those around him. But when he has his Sous-Chef outfit on and his Mama Chef by his side all seems right in his little world. And it reminds me that with God's grace this is exactly who he can, and hopefully will be, and then all is right in my little world.


6/7/11
Simply Sweet Cinnamon Rolls!
Along the lines of my last post - this one is dedicated to my mom. As noted previously, my mom was not really "into" baking. Cooking was done in order to feed the family. She did not enjoy cooking or working in the kitchen (for me, cooking/baking is like therapy/stress relief - nothing better than handing over the boys to Eli after a long day and making some cookies or something!). BUT, she did and still does make some killer cinnamon rolls!
Although she is notorious for not following recipes in an exact manner, my mom does carefully measure and make bread in order for it to turn out right. Therefore, this was one recipe that I was actually able to copy down and not hear a "well, I just put a little of this, and little of that"!
I can't tell you the number of times that my mom, my younger sister, or I have brought this cinnamon rolls to a shower or event, and gotten rave reviews. YUM. That's all there is to say. And although Jonah does not eat any other type of yeast bread, he devours Cinnamon Rolls.
The recipe is not unique. Probably almost the same to many others. But, if you have never tried to make homemade cinnamon rolls, or a recipe that you attempted previously just did not turn out well, I'd love for you to get these ones a try!
My Mother's Cinnamon Rolls
1/2 c. water
3/4 c. milk
1 T. yeast
1/4 c. white sugar
1/4 c. butter, melted and cooled
1 egg
3-4 1/2 c. flour
1 tsp. salt

1/2 c. water
3/4 c. milk
1 T. yeast
1/4 c. white sugar
1/4 c. butter, melted and cooled
1 egg
3-4 1/2 c. flour
1 tsp. salt
*Warm milk and water together. Pour into mixing bowl and add yeast and sugar. Give a swirl and let the yeast proof for about 5 min. Add in butter, egg, and 1 c. of flour. Mix well. Add rest of flour and salt in 1 c. increments, kneading until you get a slightly sticky dough. Knead an additional 2-3 min. Place in greased bowl and let rise until doubled - about 1 1/2 hours. Punch down and let rest 10 min. Roll out to about 14x10 or so (I just have this large cutting board that I roll out on until I get to the edges all around). Spread with 6 T. of softened butter or margarine, 1/8. c. white sugar, 1/4 c. brown sugar, and LOTS of ground cinnamon (I never measure this, just sprinkle over liberally until everything looks good and covered)!. Roll up and cut until 12 rolls. Place in greased 9x13, cut sides up. Let rise until doubled, and then bake at 375 degrees about 20 min - DO NOT OVERBAKE! Just until tops are browning. Pull out of over, and spread with desired glaze or frosting. We prefer cream cheese frosting! Eat, eat, and enjoy!
I did not take pictures to create a tutorial, because there are so many great tutorials already posted, like Gina's. But, here is my finished creation:

And the boy who was eagerly asking all morning when they were going to be done!
6/1/11
Mom-in-Law Lessons
I am dedicating the month of June to FAMILY. Maybe family memories, family lessons, extended family life, or family recipes ... who knows what will turn up on the blog!
When I think about my in-laws, I think of my mother-in-law (MIL). She has taught me so much! My mom was fantastic, but homemaking was not a focus for her. She was an excellent homeschool teacher and mother, but in terms of learning to bake, homemade remedies, etc., ... those weren't of interest to her. Therefore, my skills were nearly non-existent. I, on the other hand, was interested in those things!
When I realized that my relationship with Eli was headed to a lifetime commitment, I wanted to learn more. He came from his home in which his mom did all kinds of homemaker things! Especially in baking, cooking, canning, and growing in the garden. I set up about to soak up what I could. I have learned A LOT (with so much more I would like to learn), and something I was able to accomplish early on with my limited knowledge but eager hands was making jam.
Nothing like homemade jam.

I am still pretty basic. But each year I now make strawberry and peach jam. Eli doesn't like other berries thrown in there, so we stay with the staples of our pantry. I just finished two batches of strawberry (made even easier with my food processor - a gift from my in-laws!), and will tackle the peach once the season arrives. I haven't ever water-bath canned yet - a future project!
My MIL is always ALWAYS willing to show the ropes of what she knows, and invites me over to do projects together. If she knows I'm struggling to get something done, the offer is extended to "come over with the boys so they can be distracted" while I finish my project. We have baked together for Christmas, made jam together, worked together on bridal/baby showers, sewed together, and brainstormed together. She is an example of a woman who always extends her arms, and whether or not her house is messy is no matter to her - family and friends are always invited in. I have much to still learn from her, and I am so grateful to have married in to her family.
Is there something (preferably good!) that sticks out to you when you think of your mother-in-law?
5/27/11
Ice Cream Buckets
My family doesn't eat a lot of ice cream, but over time we have collected quite a few ice cream buckets. These buckets are very handy because they have a handle, a lid, and are made of plastic so they are strong.
Here are some of the current uses of the buckets around our house:
1) Drum set for toddler
2) Container to hold legos (much more convenient than the zippered bag they came in)
3) Tool caddy
4) Containter to freeze fish (I have heard that freezing fish in water makes it stay fresh longer)
5) Carry veggies from garden to the house
What do you use ice cream buckets for?
5/25/11
Grocery bags
My family just returned from visiting my brother and his family in Utah. Any time we travel for any length of time we always take plastic grocery bags with us for our dirty clothes. On this particular trip, as we were packing to come home, I had the idea of sorting our dirty laundry and placing each "load" in its own grocery bag so laundry would be a breeze. Wow, I am thankful for that revelation!
There are so many other uses for plastic grocery bags as well as paper grocery bags, just take a look at the side of the bag and you will probably find a list of ideas. Here are a few ways that we reuse grocery bags:
1) Lunch bags
2) Trash can liners
3) Wrapping packages to be mailed (paper bags)
You can also recycle your grocery bags at recycling centers or right inside the front doors of Walmart.
I know there are many more uses for grocery bags, but I am sleep-deprived (and pregnant) so I can't think of any others to list at this time.
Please feel free to leave comments regarding how you reuse grocery bags.
5/21/11
Baking Soda + Vinegar = Just About Everything {Part 3}
The last part of this segment doesn't actually have any baking soda or vinegar, but they are still useful and homemade.
Health Care
Health Care
cough syrup - We used this a lot this winter! It works just as well if not better than most of the natural cough syrups that we tried.
toothbrush sanitizer - five drops of grapefruit seed extract in a cup of water. We do this to extend the life of our brushes. If I threw away our toothbrushes every time someone had the sniffles we would go bankrupt. {ok, not really} But this disinfects the toothbrush daily to keep those germs at bay.
vapor rub - small amount of coconut or olive oil and and several drops of eucalyptus oil - mix and apply to chest.
vapor steam - add a couple drops of eucalyptus oil to the water in your steam vaporizer.
diaper rash cream - No special mix here, just plain coconut oil. It is the only thing that can be used with cloth diapers and it works really well.
Hand sanitizer - {Crunchy Betty} - I haven't made this one, but it is on my list. It would be nice to keep in the diaper bag to use after those emergency changes.
I'm sure there are many more things that could be added to this list, but these are the ones that we use most frequently.
Hand sanitizer - {Crunchy Betty} - I haven't made this one, but it is on my list. It would be nice to keep in the diaper bag to use after those emergency changes.
I'm sure there are many more things that could be added to this list, but these are the ones that we use most frequently.
5/20/11
Baking Soda + Vinegar = Just About Everything {Part 2}
Spring is the perfect time of year to get things clean. And though it is nearly summer I haven't finished my spring cleaning. Below are some of my favorite cleansers to get the job done. I do have others, but these are the ones that I find myself reaching for most often.
Cleaning
Cleaning
All purpose cleaning spray - There are tons of different recipes for all purpose cleaners. Here are two:
1. Equal parts vinegar and water and go!
2. 1 part hydrogen peroxide, 1 part water, 3 T. liquid castille soap, a couple drops essential oil for fragrance.
soft scrub - 1c. baking soda, 6 T liquid castille soap, a couple drops of lavender essential oil, and enough vinegar to achieve soft scrub consistency.


carpet freshener - put baking soda in an old parmesan cheese container add a few drops of essential oils. Sprinkle onto carpet and vacuum it up! One thing I like to use are home fragrance drops from Bath and Works - they aren't pure essential oil, but they smell oh so good.
laundry detergent - {A Bird in the Hand} I don't what more to say than I already have. I have kids, they get dirty, this gets their clothes clean.
disinfectant wipes - {Live Renewed} I haven't tried these. I never used disinfectant wipes to begin with, but it seems like they would be really handy to have around.
Furniture Spray - 1/4 cup olive oil, 4 T. vinegar, dash of lemon juice. {I'm not sure if you need to, but I keep this in my fridge}
Furniture Spray - 1/4 cup olive oil, 4 T. vinegar, dash of lemon juice. {I'm not sure if you need to, but I keep this in my fridge}
Hand soap - This one is super simple, but you have to have the right container. It is just 4 parts water and 1 part liquid castille soap. The trick is that you have to put it into a foaming soap dispenser. I just save soap dispensers and asked my mom to save hers as well. Voila! Foaming hand soap!
*What is one cleaning product that you just can't live without {this doesn't have to be homemade}. What is your least favorite cleaning project? {My favorit cleaning product is the soft scrub above, and my least favorite cleaning project is putting away clean clothes - Does that count?}
*What is one cleaning product that you just can't live without {this doesn't have to be homemade}. What is your least favorite cleaning project? {My favorit cleaning product is the soft scrub above, and my least favorite cleaning project is putting away clean clothes - Does that count?}
5/19/11
Baking Soda + Vinegar = Just About Everything {Part 1}
It is no secret that I have a unusual penchant for making things from scratch and using what I already have on hand. I enjoy finding new things that I can make at home without having to make frequent trips to the store. I keep an ongoing list of these recipes, and since most of them use a lot of the same ingredients I almost always have what I need on hand. I broke them up into categories so they would be easily accessible if anyone wants to give them a whirl. I will post one category each day for the next three days. First up: Personal Care!
Personal care
 |
| {Almost} Everything you need to make any of the recipes below - I forgot the Stevia. |
shampoo {Reformation Acres} - Using baking soda to wash your hair. Yes, I am doing this. There is a six week adjustment period for your hair, and I am smack dab in the middle of it as I type this. But even with the adjustment period I am pretty pleased with the results. I thought my hair was going to 'freak out', but it has just been a tiny bit frizzier than normal. That could also be attributed to the weather. My hair is very sensitive to weather change.
conditioner {Reformation Acres} - I don't make my "conditioner" quite as fancy as Quinn does. I just use Apple Cider Vinegar with a couple drops of eucalyptus essential oil for that fresh, wake you up scent. {The smell of both the vinegar and eucalyptus disappears as your hair dries.
hairspray {Reformation Acres} - I haven't tried this one yet, but I am hoping to soon.
leave in conditioner - coconut oil. Caution: I little bit goes a very loooong way. I used way to much the first time. Now I just rub my fingers over the oil and use only that amount that sticks to my fingers.
basic toothpaste - 1 part coconut oil, 1 part baking soda, stevia or xylitol and essential oils to taste. I have used cinnamon, peppermint, sweet orange, and even vanilla extract.
 |
| No, I haven't been using horseradish to brush my teeth, but it probably wouldn't surprise you either. |
lotion {Home Joys}- I used this lotion all winter long and it works quite well. A couple of my kids have eczema and it is gentle enough for them to use as well.
lip balm {Crunch Betty} - I haven't made any of these, but I want to. Crunch Betty also has tons of other recipes I can't wait to try.
Do you have any personal care recipes that you use? Do they work? What is your main reason for not using commercial products? {Mine is cost and healthier ingredients}
5/17/11
T-Shirts a Crafter's Best Friend!
T-Shirts are some of my favorite things. Nothing beat the softness of a freshly laundered t-shirt, especially if it is one your have had for years. I like to wear them, of course, but when they have too many holes or stains and the life has been loved right out of them, there is usually just enough left to repurpose into something new. Here is a list of some of my favorite ideas for reusing t-shirts from around the web. I have not had a chance to make most of these, but I would like to. I will star the ones I have actually attempted. I would put my own pictures on here, but sadly my camera cord has gone M.I.A. Enjoy!

T-Shirt Necklace
T-Shirt Tote Bag

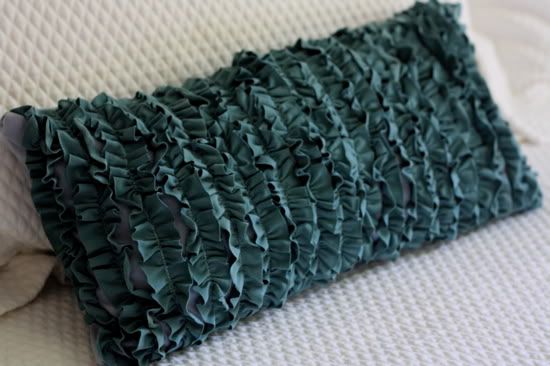
T-Shirt Pillow
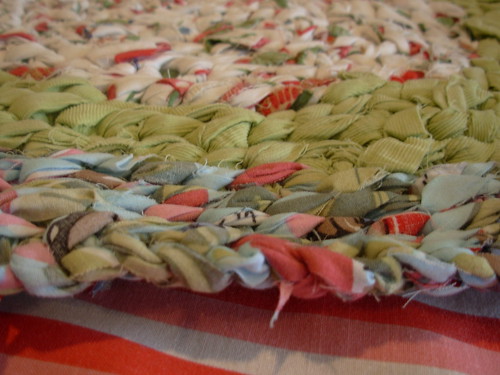
T-Shirt Rug {This one technically isn't made from t-shirts, but I have a friend who made one just like this from t-shirts.} Here is a tutorial for t-shirt yarn.
T-Shirt Dryer Pillow or Sachet

T-Shirt Boy's Undies

T-Shirt Diapers* {When I first started making diapers I used this pattern. I love making diapers from old t-shirts they have lots of stretch and wash really well}

T-Shirt Bib {These look like nice full coverage bibs. Of course your could use your favorite bib pattern}
T-Shirt Neckline Coverup

T-Shirt Backpack

T-Shirt Girl's Dress* {I made this dress for my girls. I made it a little longer, but it's a great comfy play dress}

T-Shirt Jacket

T-Shirt Quilt* {I made one of these during our early years of marriage out of a bunch of my husbands "sentimental" t-shirts. He had several from a camp that he used to work at and it has been a fun way to tell the kids about some of things he enjoyed before become a "real" adult.}

T-Shirt Simple Skirt* {This is a very easy sewing project/tutorial created by our own Sarah K. It's a great project to have little ones help out with. We have made several of these over the past year or so!}

I hope everyone's creative juices are flowing now. If you end up making one of these or any other project from a T-Shirt I would love to see it!
P.S. I did not create any of these tutorials, so please refer to the websites of the tutorial before selling any items from any of these tutorials! Thanks!
5/16/11
10 Steps to Having a Very Bad, Awful, No Good, Rotten Day!
1. Sleep In - Hit that snooze button just one more time.
2. Spend 20 minutes in your closet stressing about what to wear.
3. Realize you slept away your shower time and decide to be in a bad mood.
4. Walk around with a cloud over your head.
5. Refuse to be thankful for anything!
6. Chastise your children for every little misstep throughout the day.
7. Skip reading your bible and praying because you just don't have the time.
8. Panic about your to-do list (this must be repeated regularly throughout the day).
9. Blame everyone else for your problems.
10. Then unload the miserable account of your day to your husband the second he walks through the door. (bad days can be catching!)
If a very bad, awful, no good, rotten day is not what you are in the market for tomorrow. May I suggest the following.
1. Rise early thanking the Lord for a brand new day!
2. Lay your clothes out the night before and put on whatever you picked out (the second part is trickier).
3. Take a warm shower and pray while you shampoo and condition.
4. Smile (with your eyes too) at everyone you greet today.
5. Be thankful for EVERYTHING (even the things that make you cringe)!
6. Give grace to your children as the Lord to gives us, discipline out of love, and give lots of hugs.
7. Make sure to spend the first part of your day absorbed in the Word.
8. Ask the Lord what His to-do list is for you. That doesn't mean you can't do your laundry, but He may have other plans for you today.
9. Shower others with encouragement.
10. Greet your husband with a smile, a kiss, and some words of affirmation.
It is so counter intuitive for us as humans to want to put anyone or anything before ourselves. We want our needs met first! But the greatest joy we will ever find is in worshiping the Lord and placing Him at the very top of our priority list. Then all the things that we think that we need or want are lost in His awesome presence!
Have a great Monday Everyone!!
5/10/11
Piggybacking ...
So, I really had no idea what on earth to post about that everyone else in the world isn't already doing. I make no amazing claims in life: I really don't think that I am creative with "things"! I feel like my creativity only comes out when I start thinking about food = )
BUT. Jonah and I have been talking a lot lately about recycling things within our house to make new things, new toys, etc. He is really fascinated by the idea. Which is why we had a plastic sack stuffed with empty toilet paper rolls. For awhile, we have been recycling them - literally - through the recycling service. And then I decided that there had to be other ways we could use them at home. So, I'm piggybacking on Sarah's post about oatmeal containers to share some "similar" thoughts ...
On Toilet Paper Rolls.
-Use them as present wrappers. Stuff the gift inside and wrap with either comics from the newspaper, colorful tissue paper, or wrapping papers. The boys love getting presents wrapped like this!
-Re-roll extra ribbon around them. Or short cords that you need to store away and don't want all tangled or bent.
-A current favorite with the boys: create them into binoculars. And this way, whether the binoculars get destroyed or lost, they are re-creatable and not something you paid $$ for!
-The newest idea: Make a dinosaur (or any other creature you like!). We have to give Jonah credit for this: he just suddenly began asking Daddy to help him "make a dinosaur out of my rolls in the bag". We've asked him several times where this idea came from, and he just insists it was "from myself!" Maybe it really was! They had a great time working on this together.
We're actually out now ... perhaps once another sack is filled, a brontosauras can join the t-rex = ) Either way, I'm not tossing those tubes into the trash any more!
5/6/11
Don't just toss those oatmeal containers!
We love oatmeal pancakes, oatmeal chocolate chip cookies, oatmeal & dried cherry muffins, granola, no-bakes, bake n take oatmeal cake...ok, this is turning into 101 reasons we love oatmeal, but I think you are getting the picture that we go through a lot of oatmeal around here, so there are always lot's of oatmeal containers around! Here are some ways you might use your surplus:

Fridge/Freezer storage for grains and baked goods.
I keep my freshly ground wheat and rice in them in the fridge so as to preserve the 'goodness' and keep them from going rancid. I don't have the lifestyle (or desire, I should say?) to mill on an as-needed basis, so it's what I do.
For the Kids
Building blocks
Robot pieces
"Tree Trunks"
one year I created a tree out of one for my 2YO(at the time) niece. I attatched a "branch" made out of a paper towel or TP tube, cut some doors and put some animal stickers on the inside for her to open up and see, and used green tissue paper for the leaves out the top. It wasn't meant to last, I was just using stuff I had on hand, but I thought she'd enjoy discovering it and tearing it apart. it was a fun project
Basically Anything:
kids' imaginations are so wonderful! I love having the containers around just to see how they will incorporate them into their play this time! Kids are usually more excited about the wrapping/paper/box/hangers/etc than the toys & clothes they contain.
("free!") toy storage
legos, little people, army men, playmobile, dinosaurs, etc., ad nauseum, 'nuf said!
I've found that wrapping them in wrapping paper (least durable), scrapbooking paper (more durable; coverage requires 2 sheets), or even fabric (most durable) takes them to a whole other level!
Gift Wrapping
I wish I had a photo of several of the gifts I've done this with- they look so striking!
Its unique shape and height lends handiness for all kinds of different presents, especially soft, or stackable, or foldable ones, while also making it stand out from the rest of the presents.
Table Tiers
I wrapped one with some fabric for a bridal shower that I was hosting several years back. I was looking for a way to create more space and add some visual interest to the table, and going up was the best way to do so!

I'm pretty sure I filled the container with something so as to add to its stability because I was a little nervous about it tipping as people took food, but we didn't have any problems whatsoever with that.
Plastic bag holders
for my fellow disposable diaper users out there- this is one of my favorite things! In order to combat the smell of diaper pervading the nursery and our home, we recycle the plastic bags we get at the stores (one reason I don't want them to be banned just yet!), putting the diapers in there and then out in the garage. For a while I was always carrying dirty diapers down to the laundry closet to grab a plastic bag. Duh! The idea struck me that it would be much simpler, and cleaner!, to just have plastic bags at my changing stations. So I grabbed my oatmeal containers (great for stuffing lots of bags into!) and made them pretty. If it's gotta be seen, it might as well look good!
5/4/11
Kitchen Tip: DIY powdered sugar
Out of powdered sugar? You can make it yourself!
I picked up this little tidbit from my "More with Less" Cookbook, and have found it to come in handy in a pinch!
1 cup granulated sugar
1 Tbsp cornstarch
mix together in a food processor until fine and powdery
It took a while for mine to come out, but it worked just fine for the icing I needed it for, and saved me a mad dash to the store and back.
I've been thinking it would be nice to find something without the cornstarch or the bleached sugar. So, inspired by that recipe, I searched the internet some more ideas and found this further gem for making unprocessed powdered sugar out of sucanat from Heavenly Homemakers.
Such a great tip, if you don't require a pure white icing/frosting/powdering!
Sweet!
5/2/11
101 pillow ideas
Ok, so I don't have 101 ideas to share right now, but I'm hoping these ideas might inspire you, or get your creative pillow juices flowing, and from there we might get to 101!
Quilting
If you enjoy quilting but only have scraps left, a pillow can be a fun, colorful way to use them up. I think it would also be a great beginners sewing and quilting project; not quite as daunting as a whole quilt. Or, if
 you are making a quilt and have an odd square left, like I did while making my first baby quilt, a pillow is a sensible way to make good use of that material! I always make my pillows slipcovers, both for laundering purposes and my own inability to commit combined with my not wanting to waste perfectly good pillow stuffing.


this one makes me laugh to think that I use to have time to play around with a needle like that. I am in no way a great or even quilter or seamstress or needlepointdextress; I just enjoy creating! It's fun to come up with ideas and then to watch them materialize, isn't it? Well, at least when they materialize the way you envisioned them. But even when they don't, that's what makes it your creation!
idea: Last Summer I picked up a pretty little throw pillow that had a lovely embroidered handkerchief as the main block with several squares of material quilted around it. I think that might be a fun sewing project I'd like to share with my nieces or daughters!
Placemats
One of Jeni's cousins shared with her the idea of using placemats to create pillows. I was almost giddy when I heard of this idea! I LOVE table linens; they are my clearance downfall. So to have a new way to utilize them was/is so exciting!
 To make them:
1) rip out one of the short side hems.
2) stuff with the desired amount of stuffing
3) stitch up the side again
voila! so easy! so pretty!
This is just one of those projects that can't go wrong, and can make such a difference in a room! I have two of these yellow placemat pillows on my guest bed in the nursery and they are the perfect touch to tie everything together! I couldn't have found better "real" pillows.
 Table Runner Bolster Pillow:
Like I said, I have a weakness for linens, especially on clearance or garage sales. I was able to repurpose one of the brown table runners I'd purchased as a bolster pillow for our bed, since we love to read in bed. It was the perfect length to stretch pretty much from end to end of our king size. I purchased two body pillows for their stuffing, and that worked perfectly!
Bags
This one is another favorite! I found this great little bag at Goodwill one day and kept it for years trying to figure out ways to use it. T hen a couple years ago when I was redoing my living room and looking for new, euroflare throw pillows, I realized it would work perfectly on my couch. Some stuffing and folding and top stitching, and suddenly I had a new favorite pillow. Now I always check garage sales, estate sales, antique shops and second hand stores for more bags or table linens printed with maps or designs that can come keep this one company =)
How about you? What's your favorite resource for making pillows?
Quilting
If you enjoy quilting but only have scraps left, a pillow can be a fun, colorful way to use them up. I think it would also be a great beginners sewing and quilting project; not quite as daunting as a whole quilt. Or, if

 you are making a quilt and have an odd square left, like I did while making my first baby quilt, a pillow is a sensible way to make good use of that material! I always make my pillows slipcovers, both for laundering purposes and my own inability to commit combined with my not wanting to waste perfectly good pillow stuffing.

this one makes me laugh to think that I use to have time to play around with a needle like that. I am in no way a great or even quilter or seamstress or needlepointdextress; I just enjoy creating! It's fun to come up with ideas and then to watch them materialize, isn't it? Well, at least when they materialize the way you envisioned them. But even when they don't, that's what makes it your creation!
idea: Last Summer I picked up a pretty little throw pillow that had a lovely embroidered handkerchief as the main block with several squares of material quilted around it. I think that might be a fun sewing project I'd like to share with my nieces or daughters!
Placemats
One of Jeni's cousins shared with her the idea of using placemats to create pillows. I was almost giddy when I heard of this idea! I LOVE table linens; they are my clearance downfall. So to have a new way to utilize them was/is so exciting!
 To make them:
1) rip out one of the short side hems.
2) stuff with the desired amount of stuffing
3) stitch up the side again
voila! so easy! so pretty!
This is just one of those projects that can't go wrong, and can make such a difference in a room! I have two of these yellow placemat pillows on my guest bed in the nursery and they are the perfect touch to tie everything together! I couldn't have found better "real" pillows.
 Table Runner Bolster Pillow:
Like I said, I have a weakness for linens, especially on clearance or garage sales. I was able to repurpose one of the brown table runners I'd purchased as a bolster pillow for our bed, since we love to read in bed. It was the perfect length to stretch pretty much from end to end of our king size. I purchased two body pillows for their stuffing, and that worked perfectly!
Bags

This one is another favorite! I found this great little bag at Goodwill one day and kept it for years trying to figure out ways to use it. T
 hen a couple years ago when I was redoing my living room and looking for new, euroflare throw pillows, I realized it would work perfectly on my couch. Some stuffing and folding and top stitching, and suddenly I had a new favorite pillow. Now I always check garage sales, estate sales, antique shops and second hand stores for more bags or table linens printed with maps or designs that can come keep this one company =)
How about you? What's your favorite resource for making pillows?
5/1/11
One Hundred and One
 yikes! Not only is it my week to write, it's my month to pick a topic!
The first of a new month always creeps up on me and catches me unawares, especially when the new month starts on a Sunday! Sunday is that strange day: last day of the weekend and first day of the calendar week. My birthday is on the first day of a certain month, so I feel for the firsts because they are often forgotten about until they hit you in the face as you flip the calendar. I thought I saw this one coming, since I've been longing for its arrival to herald in a renewed grocery budget with which to restock the pantry and freezer. So there I was, smugly ready to turn the computer off and head to bed when it hit me: tomorrow is May first, May Day! My month to choose. My week to write. And we have a church conference all weekend long, so I better get this done so everyone else can get their wheels turning! This weekend has been crazy with errands, a funeral/life celebration, conference, and even baby showers that I will sadly have to miss. Don't you always find that May has 101 directions to pull you in? gardening, spring cleaning, school finishing, outdoor playing, yard working, graduation/baby/wedding showering... It is one busy month! 101 things to do...
Did you know that the Old English name for the month of May meant "month of 3 milkings" and that abundance is in part why there are May Day celebrations? Well, thanks to wikipedia, now you and I both can impress others with that gem. In more recent European history, May Day commemorates the socialist movement and uprisings, and is sometimes referred to as Labour Day. The town that I lived in in the Czech Republic had a square named "Prvni Maj", or May Day, and in the middle was a concrete platform on which a bronze statue of Lenin used to stand. He had since been pulled down and that platform was instead being used for skateboarding by rebellious teens dabbling in Western culture. 101 tidbits of pretty useless, but interesting, information...
Mainly I chose "101" because I like to use things in multiple different ways, and thought it would be fun to share some of those ideas, and even more fun to hear everyone else's ideas and add their tricks to my back-pocket. But today is the first. And although, as I said before, Sunday firsts especially sneak up on me, I especially love them because they remind me of what my priority for ordering my days needs to be: He comes first. His Name, which is above every name. His praise, glory, honor. His will. His Word. His commandments. His testimony. His people. His calling. As I think about the busyness that is May, with all its directions, distractions, obligations, and social occasions, I have been greatly challenged by the appropriate applicability of the following psalm:
Psalm 101 (NASV)
A Psalm of David.
1I will sing of lovingkindness and justice,
To You, O LORD, I will sing praises.
2I will give heed to the blameless way
When will You come to me?
I will walk within my house in the integrity of my heart.
3I will set no worthless thing before my eyes;
I hate the work of those who fall away;
It shall not fasten its grip on me.
4A perverse heart shall depart from me;
I will know no evil.
5Whoever secretly slanders his neighbor, him I will destroy;
No one who has a haughty look and an arrogant heart will I endure.
6My eyes shall be upon the faithful of the land, that they may dwell with me;
He who walks in a blameless way is the one who will minister to me.
7He who practices deceit shall not dwell within my house;
He who speaks falsehood shall not maintain his position before me.
8Every morning I will destroy all the wicked of the land,
So as to cut off from the city of the LORD all those who do iniquity.101 things to praise Him for, 101 things I need Him for, 101 things to keep me on my knees...
4/27/11
Sew...a Needle Pulling Thread - A Snazzy Visored Headband Tutorial
The other day as I was perusing through blog-land looking for a sewing project to use up some scraps. I stumbled across this cute little visored headband. My girls have also been begging for me to teach them about the wonderful world of sewing, and this seemed like a great project for beginners.
Now, I do want my kids to learn to sew, because it is such a wonderful skill and I enjoy it very much. But as I said before I'm pretty impatient {this is something the Lord and I are working on}. I really don't want my children to learn from an impatient teacher, or one who expects more out of them than they can give at their age. This is how I was taught and it turned me off to sewing for many years.
So we started with a small project and lots of prayer on my part. I'm not sure what I was expecting, but instead of me getting frustrated, we had lots of fun! Who knew? I'm learning!
Before I posted this I looked to see if anyone else had made a tutorial, but couldn't find one. So here is what we did.
Visored Headband Tutorial
Supplies:
* You can click on any picture to enlarge it.
Step 1: Find a visored hat that fits. Push the visor flat and trace onto piece of paper. This will be your visor pattern.
 Step 2: Add a line 1/2" larger than your first line and cut on that line.
 Step 3: Put pattern on fabric, pin and cut, or if teaching younger kids have them trace around the pattern with a washable marker and then cut on the line. Make sure to cut two.
 Step 4: Cut interfacing using the same pattern.
Step 5: Cut long strips for head band.


 Step 8: Pin right sides of visor together and sew around the curved edge. {sorry, no picture of this either}
Step 9: Take headband fabric and place right sides together. before you pin your headband pieces together, sandwich your visor in between the two layers. Making sure to match like fabrics together if you are making it reversible. Pin and sew along the side where you sandwiched in your visor.
 Step 10: Fold the visor in half and pin in place, like so.
 Step 11: Sew along other side of headband, leaving a space to turn your head band right side out.
Step 12: Turn and topstitch your visored headband. You are finished - Congratulations!!
 If any of you end up making one of these please leave a link, I would love to see how it turns out. Also if you have any question feel free to ask in the comments, or e-mail {my e-mail is in the more about us section}. Happy sewing!
This post is linked up at Raising Homemakers.
Supplies:
- Fabric for headband{use two different patterns for a reversible visor} Cut 2 - 42" x 3 1/2" {I used fat quarters and cut 4 lengths of 22" x 3 1/2" and sewed the ends together}
- Fabric for visor {approx. 5" x 10"} - I didn't really measure this part.
- Iron on Interfacing - {approx. 5" x 10"}
- Thread
- Scissors
- Washable marker (optional)
- Pin (pins are always optional!)
* You can click on any picture to enlarge it.
Step 1: Find a visored hat that fits. Push the visor flat and trace onto piece of paper. This will be your visor pattern.


Step 5: Cut long strips for head band.

Step 6: Iron interfacing onto one side of the visor. Somehow I missed a picture of this. If you have never used interfacing, there are usually directions on the side. Iron the rest of the pieces for good measure. {This was also a good lesson for the girls.}

Step 7: Take the two strips for the headband and fold them in 1/2 lengthwise. Cut a curve into the top as shown. This isn't necessary, but makes the ends look a little more finished.


Step 9: Take headband fabric and place right sides together. before you pin your headband pieces together, sandwich your visor in between the two layers. Making sure to match like fabrics together if you are making it reversible. Pin and sew along the side where you sandwiched in your visor.


Step 12: Turn and topstitch your visored headband. You are finished - Congratulations!!

This post is linked up at Raising Homemakers.
4/25/11
Baking with Kids
I don't love to bake. My kids do but I...don't. Since it is something that means a lot to them, I do try to make a frequent joyful effort. This past week as we were gearing up for Resurrection Sunday I wanted to include this little baking project I had seen floating around the web. I am so glad that I did! The main reason I don't appreciate baking as much as I could is because I am terrible at following directions. I am impatient and I want to get to the actual 'doing' instead of the 'reading about the doing'. {Yes, I am a bit of a child.} This project was a perfect example of my lack of thoroughly understanding a recipe before proceeding.
Resurrection Cookies (original recipe here)
I changed things a tiny bit from the original, according to what I had on hand.
You will need:
1c. whole pecans
1 tsp. apple cider vinegar
3 egg whites
pinch salt
1c. sucanat
zipper baggie
wooden spoons (one per child)
tape
Bible
Preheat oven to 300.
Instructions:
Read John 19:1-3
Place the pecans in a baggie and let the kids beat the pecans into little pieces. My kids gleefully pulverized the little bits of pecans until they turned into dust. Such a horrible picture of how much we love our sin, and how if I had been there, I would have been the one shouting "Crucify Him!"
 Read John 19:28-30
Put 1 tsp. vinegar into mixing bowl and Let each child smell the vinegar.
Explain that when Jesus was on the cross they gave Him sour wine when he said He was thirsty. This was a little lost on my kiddos, because when I asked if they would have wanted to drink vinegar, if they were really thirsty, they thought it sounded pretty good. Then Charis to drink a small glass of vinegar. {I should have let her, but we were quickly nearing bed time}.
 Read John 10:10-11
Add egg whites to vinegar. {I apparently didn't read this, because I put the vinegar in the pecan bowl. whoops!} Eggs represent life. Explain that Jesus gave His
life to give us life.
 Read Luke 23:27
Sprinkle a little salt into each child's hand and let them taste it. Then add a pinch to the bowl. {This refers to the egg white bowl. Again I put the salt in with the nuts.} The salt represents the salty tears shed by Jesus' followers, and the bitterness of our own sin. The kids loved this part, but also really seemed to grasp what was going on with the story.
 Read Ps. 34:8 and John 3:16
Add 1c. sugar. {Where?, who knows - probably the egg whites - note to self: learn to read directions} Give a little pinch to the kids to taste and yourself of course. I love this part! Explain that Jesus' dying for us is the sweetest gift of all! My kids are still at an age where they don't fully understand why Jesus had to actually die. It was another great opportunity to explain that we could have never bridged the gap between God and us without Jesus being the atoning sacrifice.
 Read Isa. 1:18 and John 3:1-3.
Beat with a mixer on high speed for 12 to 15 minutes until stiff peaks are
formed. {I had a little trouble with my egg whites, probably because I didn't put the right ingredients into the right bowls. When I was making this it didn't seem right, but I didn't question it. Oh well.} The white represents purity and being washed white as snow. My kids also wanted it to be the clouds, like in heaven. {Are there really going to be clouds in heaven? Do I get a harp? Ok - digressing here!}

Read Matt. 27:57-60.
Fold in broken nuts. {This is when I realized the error of my ways, but I didn't let the recipe know, I just kept on. Hopefully it will still turn out okay} Drop onto a wax paper/parchment paper covered cookie sheet. {You don't want them too big or it won't work, so says the original recipe}
Each mound represents the tomb where Jesus' body was laid.
Read Matt. 27:65-66.
Put the cookie sheet in the oven, close the door and turn the oven OFF. Give each child a piece of tape and seal the oven door. Make sure the oven isn't too hot! We had a bit of whining at this point. Well we have whining a lot over here. We are working on that. Explain why Jesus' tomb needed to be sealed.
SEND CHILDREN TO BED! {We also had some whining at this point}
The recipe says to talk about how sad they must feel about leaving the cookies in the oven overnight and equating it with how Jesus' followers must have felt when they had to leave Him in the tomb. I did explain it, but made sure that they knew that leaving a cookie isn't really anything like mourning the death of the promised Messiah!
Read John 16:20 and 22.
The next morning:
Read Matt. 28:1-9, open the oven and give everyone a cookie.
The surface should be cracked and the cookies should be hollow!
On the first Easter Jesus' followers were amazed to find the tomb open and empty.
{Well mine turned out flat and lifeless, but still delicious.}
 Note: Cookies can be left on a very very low temp..like 250 degrees. and be ready
in a couple of hours...when surface of cookie looks dry and cracked....they
are ready to eat!!!!!
Even though the cookies themselves were a bit of a flop, the story of Christ's death and resurrection became that much more tangible to my children, and any project that does that is a winner in my book. They also got a chance to see what happens when you don't follow directions completely, and it gave me a chance to fail graciously in front of my children. We will definitely be doing this again!
Resurrection Cookies (original recipe here)
I changed things a tiny bit from the original, according to what I had on hand.
You will need:
1c. whole pecans
1 tsp. apple cider vinegar
3 egg whites
pinch salt
1c. sucanat
zipper baggie
wooden spoons (one per child)
tape
Bible
Preheat oven to 300.
Instructions:
Read John 19:1-3
Place the pecans in a baggie and let the kids beat the pecans into little pieces. My kids gleefully pulverized the little bits of pecans until they turned into dust. Such a horrible picture of how much we love our sin, and how if I had been there, I would have been the one shouting "Crucify Him!"

Put 1 tsp. vinegar into mixing bowl and Let each child smell the vinegar.
Explain that when Jesus was on the cross they gave Him sour wine when he said He was thirsty. This was a little lost on my kiddos, because when I asked if they would have wanted to drink vinegar, if they were really thirsty, they thought it sounded pretty good. Then Charis to drink a small glass of vinegar. {I should have let her, but we were quickly nearing bed time}.

Add egg whites to vinegar. {I apparently didn't read this, because I put the vinegar in the pecan bowl. whoops!} Eggs represent life. Explain that Jesus gave His
life to give us life.

Sprinkle a little salt into each child's hand and let them taste it. Then add a pinch to the bowl. {This refers to the egg white bowl. Again I put the salt in with the nuts.} The salt represents the salty tears shed by Jesus' followers, and the bitterness of our own sin. The kids loved this part, but also really seemed to grasp what was going on with the story.

Add 1c. sugar. {Where?, who knows - probably the egg whites - note to self: learn to read directions} Give a little pinch to the kids to taste and yourself of course. I love this part! Explain that Jesus' dying for us is the sweetest gift of all! My kids are still at an age where they don't fully understand why Jesus had to actually die. It was another great opportunity to explain that we could have never bridged the gap between God and us without Jesus being the atoning sacrifice.

Beat with a mixer on high speed for 12 to 15 minutes until stiff peaks are
formed. {I had a little trouble with my egg whites, probably because I didn't put the right ingredients into the right bowls. When I was making this it didn't seem right, but I didn't question it. Oh well.} The white represents purity and being washed white as snow. My kids also wanted it to be the clouds, like in heaven. {Are there really going to be clouds in heaven? Do I get a harp? Ok - digressing here!}

Read Matt. 27:57-60.
Fold in broken nuts. {This is when I realized the error of my ways, but I didn't let the recipe know, I just kept on. Hopefully it will still turn out okay} Drop onto a wax paper/parchment paper covered cookie sheet. {You don't want them too big or it won't work, so says the original recipe}
Each mound represents the tomb where Jesus' body was laid.
Read Matt. 27:65-66.
Put the cookie sheet in the oven, close the door and turn the oven OFF. Give each child a piece of tape and seal the oven door. Make sure the oven isn't too hot! We had a bit of whining at this point. Well we have whining a lot over here. We are working on that. Explain why Jesus' tomb needed to be sealed.
SEND CHILDREN TO BED! {We also had some whining at this point}
 |
| Pretending to look sad. |
Read John 16:20 and 22.
The next morning:
Read Matt. 28:1-9, open the oven and give everyone a cookie.
The surface should be cracked and the cookies should be hollow!
On the first Easter Jesus' followers were amazed to find the tomb open and empty.
{Well mine turned out flat and lifeless, but still delicious.}

in a couple of hours...when surface of cookie looks dry and cracked....they
are ready to eat!!!!!
Even though the cookies themselves were a bit of a flop, the story of Christ's death and resurrection became that much more tangible to my children, and any project that does that is a winner in my book. They also got a chance to see what happens when you don't follow directions completely, and it gave me a chance to fail graciously in front of my children. We will definitely be doing this again!
Subscribe to:
Posts (Atom)